
So, you’re an up and coming eCommerce retailer. Things are going fairly well, but you’re looking for ways to excel your brand and sales, and ultimately set yourself apart from competition. What’s the best course of action?
Well, there are many actions that can be taken at this stage to provide the ‘wow-factor’, such as investing more in kitting, improving customer service, or fine-tuning your website. While these are all worth exploring further, they all require significant investments of both time and money. On the other hand, optimising your product photography is a fairly straightforward and inexpensive way to provide that extra ‘wow-factor’. Not only this, but it’s the fastest and most effective way to promote your products.
This article will focus on ways to optimise your product photography; an area of great importance when it comes to selling your products online.
The Importance of Product Photography
First, let’s explore why optimising product photography is so important.
- Product photos are an essential piece of the eCommerce puzzle – particularly as customers can’t touch or interact physically with online goods.
- High quality photos imply high quality products; product photos are often the first thing a customer will see related to your brand, making them useful for creating a powerful first impression. They also ensure your customers know exactly what they’re buying.
- As above, your brand identity can be established and reflected extremely effectively through your product photos. Use this to your advantage.
- Shoppers find the presence of product photography on your eCommerce website reassuring; they make your store more trustworthy.
-
Use of product photography will increase your conversion rate:
A study by Etsy concluded that around 90% of shoppers they surveyed believe the quality of product photos were very important when deciding whether or not to make a purchase -
Product photos can be utilised across all of your marketing channels.
Effective product photography is 40% more likely to be shared via your social platforms, leading to increased brand exposure. - Research shows that 22% of eCommerce returns are due to the ordered items looking different to the product photos.
- Studies conducted by Justuno revealed that as high as 93% of customers find visual aesthetics to be the deciding factor when making a purchase decision.
How to Optimise eCommerce Product Photography
1. Getting technical: Know your camera
Before getting into the nitty gritty of optimising your product photography, it’s best to start with a basic foundation of understanding how your camera works… if you’re a camera nerd like me and already know all this, it’s probably best to skip ahead.
I’ll try to explain this in layman terms. Think of exposing an image properly in the same way as your eyes and brain working together to expose a scene in real life properly.
Very simply put, light enters your eyes and hits receptors which your brain converts to an image… In a similar way, light enters the lens of your camera and hits your camera sensor, at which point the wizards who live inside of your camera process the light readings from the sensor into an image (I’d love to say magic actually happens in there… but it’s really just some clever science which we won’t go into in this article)
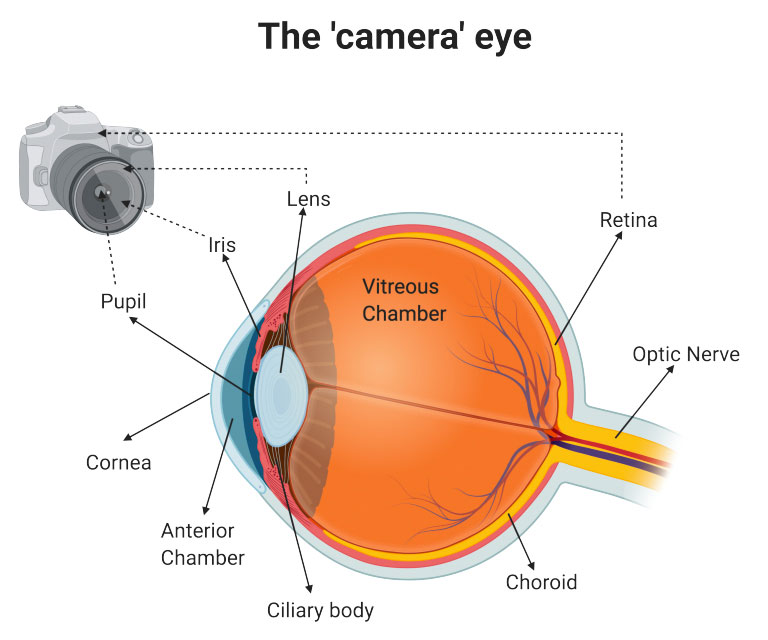
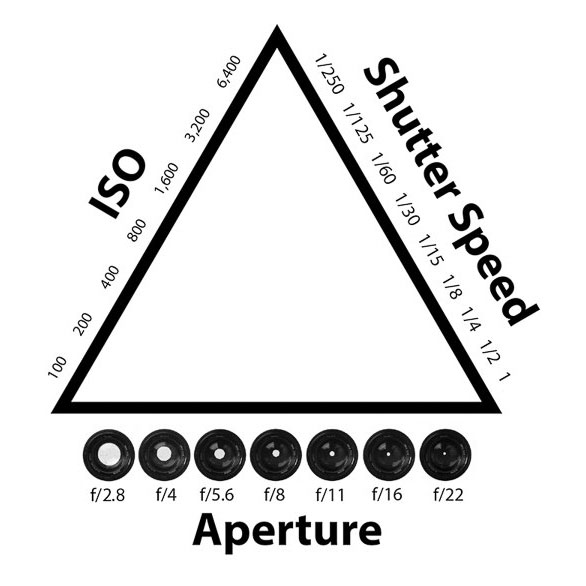
Aperture – this is how wide open the hole in the lens is.
Low aperture = wide opening = more light entering the camera.
High aperture = narrow opening = less light.
Think of the aperture as your pupil – when your pupils dilate, more light hits your retina. When they contract, less light enters.
Shutter speed – how long the shutter is open i.e. how long light is able to enter the camera
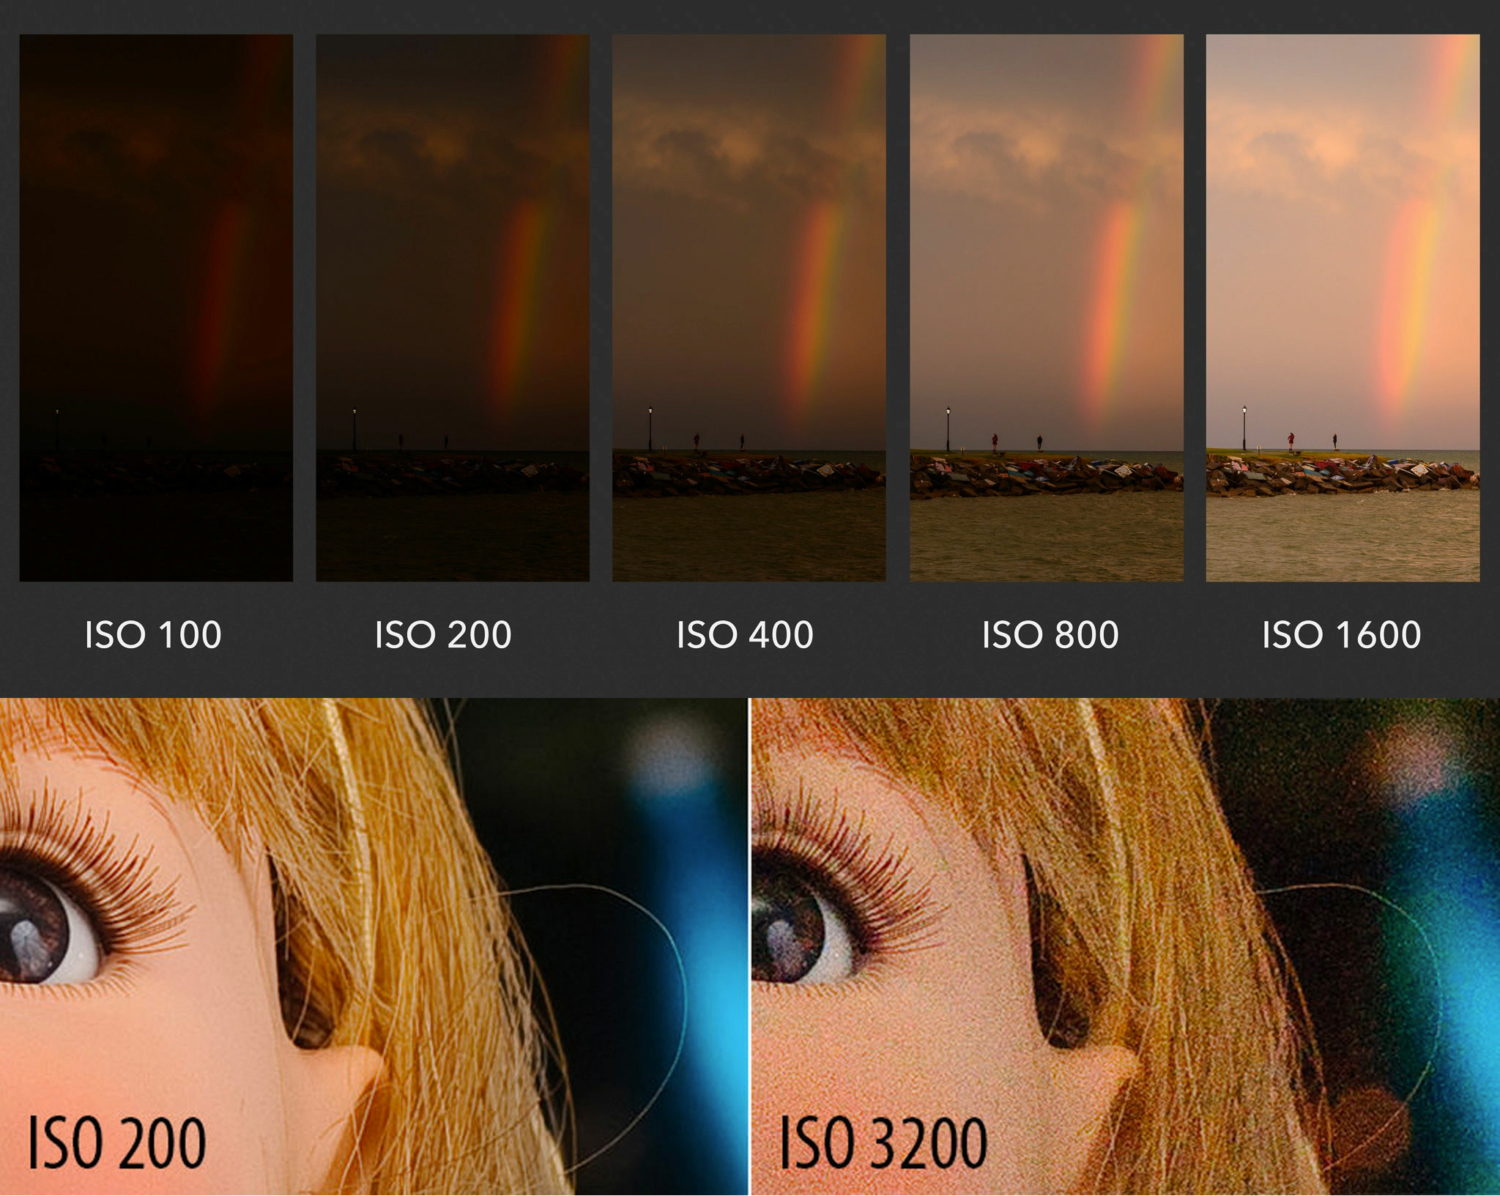
ISO – how sensitive the sensor is to light. Back in the days of film photography, ISO/ASA numbers indicated how reactive film was to light. This carried over to the digital age, with camera sensors replacing film.
Low ISO = less reactive to light = less sensor noise/grain = clearer image
High ISO = more reactive to light = more sensor noise/grain = fuzzier image
2. Apply your knowledge: Using the right settings
In the case of product photography, you will most likely be dealing with a static i.e. non-moving subject. As your product (hopefully) won’t be sprouting legs and running off anywhere soon, a lower shutter speed can be utilised, as there will be no need to combat motion blur. Remember, low shutter speed = longer amount of time for light to enter the camera.
With more light entering the camera, your ISO can be lowered, as the sensor won’t be working as hard to capture light. Again, the added benefit of using a lower ISO is that the final image will be less grainy… essentially your product photo will be clearer.
Alternatively, to compensate for more light entering the camera (but only if the product you are photographing became overexposed when you lowered the shutter speed), you could use a narrower aperture (smaller lens opening) to let less light in.
Last bits of technical camera info here… as we’ve already identified, altering your aperture is one method to control the amount of exposure in a scene. But it’s also one of the most impactful stylistic tools in photography, making it vital to understand how changing it can help you reach your desired style/look.
Altering aperture allows you to control the depth of field in your images (the amount of the image that is in focus). Using a wide aperture (wide opening) will lead to a shallow depth of field, meaning a shallow area of your image is in focus – or in layman terms, the subject of your photograph (in this case, your product) will be in focus while the background is soft/blurred.
Use of a wide aperture and shallow depth of field is usually desirable for product photography, as a blurry background will isolate the subject of the photo. This technique can also be useful if, for whatever reason, the background of your image is undesirable – so blurring a distracting background will soften unwanted details and ensure the viewer of the photo is drawn to your product in perfect sharpness.
3. Determine which approach best reflects your brand
- Studio – your product is placed against a simple, usually single colour block background. This is a basic yet effective approach; let your product do all the talking.
- Pack-shot – your product is photographed either inside or alongside any packaging it is usually sold with. A good approach if you have invested time into your packaging and want to showcase this to the customer, particularly if you think the packaging could be a deciding factor when it comes to making a purchase decision.
- Group – consider grouping a range of your products together to capture them all at once. This could help convince a potential customer to purchase multiple items at once.
- Lifestyle – there are two types of lifestyle product photos.
-
Lifestyle – In Use
Your product is photographed while in use. Think about what you are selling and to who. What might your ideal customer look like, what sort of environment would they be most likely to use it in? This approach is clever as it can be reassuring to the potential customer (even subconsciously) to see someone like themselves using your product. -
Lifestyle – In an Environment
Your product is photographed in an environment and around items which reflect your brand and the product being sold. You want your potential customer to imagine themselves using your product.
4. Ensure the product is properly lit
They say photography is the art of light – so it’s important to get your lighting conditions just right. If the lighting is off it can wildly throw off the quality of the final image, but if you get the lighting just right, you will have more control and be able to use optimal product photography camera settings.
For instance, if you’re doing a product photoshoot and the scene is underexposed, to compensate you would have to raise the ISO which would introduce grain to the image. Not what we want.
You may well be conducting your own product photoshoots, and you may not have access to any professional studio lighting setups. Don’t worry if this is the case!
Setting up your scene next to a window with lots of natural light is a simple and effective way to enable you to capture stunning product shots, but be careful of direct sunlight which could cast undesirable shadows across your product. A curtain or thin piece of fabric is a great way to diffuse any harsh, direct light – instead casting soft, even lighting across your scene.
5. Fill the Frame
This is a straightforward tip. You don’t want to be leaving your customer trying to figure out what they’re looking at. Make it obvious for them. You want the subject of the photo (your product(s)) to fill most of the frame. Not only does this make it clear what the viewer is meant to be looking at, but it will ensure the product photo captures as much detail as possible.
Not only does this make it clear what the viewer is meant to be looking at, but it will also ensure they aren’t distracted by anything else going on in the scene. Furthermore, you will be able to capture finer details in greater quality, which we’ll look at next.
To reiterate: let your product dominate the frame, leaving little, if any, space around the subject.
6. Capture Every Detail
If any of your products have stunning details, it’s important to showcase these to your customers. Remember that online shoppers miss out on experiencing the tangibility of in-store goods. It’s not like they can pick up and interact with your product, so it’s up to you to ensure your potential customers can still have an enjoyable online shopping experience.
This can be assured in part by providing them with product photos that capture every detail. Don’t be afraid to take close ups too, but also…
7. Switch It Up
This links back to the topic of facilitating an enjoyable online shopping experience. Switch things up to allow shoppers to see something different with each product. As I often say, variety is the spice of life.
This can be achieved by something as simple as changing photo backdrops between each product, or employing different shoot techniques, as we explored previously in point three.
Not only this, but you could shoot a variety of horizontal and vertical product photos.
8. Edit Your Product Photos
This is an often overlooked area of product photography… and photography in general. Photos straight out the camera can often look flat and dull. Editing your product photos if a great way to bring them to the next level.
The idea is to correct any imperfections in the image and make your product ‘pop’ – but be careful not to overdo it, as this could lead to your product looking unrealistic. Image cropping, white balance, saturation, and exposure correction tools are all useful when optimising your product photography.
Adobe’s image editing software (Photoshop and Lightroom) are the industry standards, but these come at a fairly significant cost. Alternatively, you could use free alternatives as listed in this article.
9. Boost Your Search Engine Optimisation
10. Consider Outsourcing Your Product Photography
This article will hopefully leave you feeling well-equipped to tackle your own product photoshoot. However, depending on the circumstances, it may make more sense to outsource your product photography. My recommendation would be to give it a try first to see – who knows, you might be a natural at product photography.
The benefit of a professional photography studio is that they will have invested in high-end equipment & software, and have streamlined the process (leaving you more time to focus your efforts elsewhere). But that’s not to say you absolutely need access to all the bells and whistles to make your product photos stand out, so again, it depends on your situation.